

![]()
How to Cook: Grilling
By Nutritional Weight & Wellness Staff
June 19, 2024
At the end of a long day, you’re reaching for whatever is fast, balanced and healthy, and oh yeah, delicious too, please!
That’s where our “How to Cook” series comes in. We want to share the tips we give our clients so that you can get delicious, healthy meals on the table (or patio table in this case) without a lot of work.
Today we’re stepping out of the kitchen and into the backyard to talk about grilling.
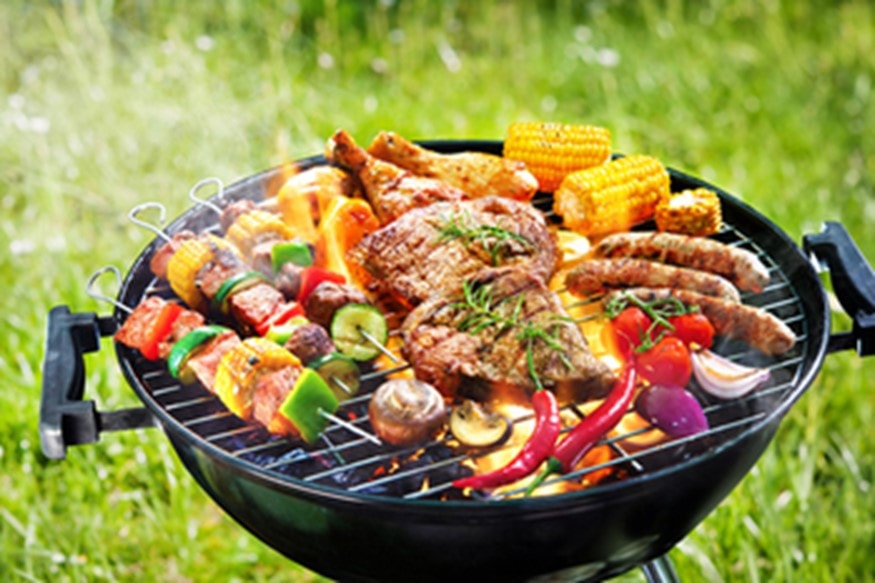
There’s nothing quite like a perfectly grilled piece of meat or yummy grilled vegetables; so, fire up that grill and try these tasty recipes and helpful tips!
General Grill Guidelines
Type of Grill: Charcoal Grill vs. Gas Grill
For grilling newbies, we often get this question: “what type of grill should I use?”
There have been many heated debates over the years as to which type of grill is better: gas or charcoal grill.
Our answer: it depends on the griller!
It’s important to note that no matter which method you choose, gas or charcoal, over-charring meat is problematic and should be avoided. More on that in a bit!
Gas Grills:
When it comes to convenience, gas grills have a huge advantage over charcoal.
Gas grills start easily with the touch of a button, unlike charcoal grills which require 15-30 minutes to properly prepare.
In regards to the safety category, gas grills also come out on top. They involve fewer chemicals and allow you to better control the temperature to prevent charring.
Charcoal Grills:
When it comes to that smoky flavor, many people find that charcoal takes the prize in this grilled food category.
The good news for charcoal enthusiasts is that there are several steps you can take to reduce the health risks that come with charcoal grilling:
Use All-Natural Charcoal
Many popular charcoal brands contain added chemicals for easier lighting. Unfortunately, these chemicals can also migrate into food. Since there haven’t been any studies done on the safety of food residues from chemically-enhanced charcoal, it is difficult to say what health consequences might exist.
It’s better to be safe than sorry so opt instead for all-natural charcoal or natural wood chips, which do not contain added chemicals and is better for the environment.
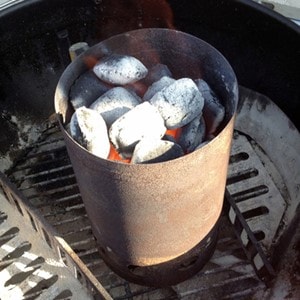
Use A Chimney Starter
Instead of lighter fluid to start the coals, use a chimney starter with your natural charcoal. This prevents you from inhaling harmful chemicals.
Lighter fluid can also impart toxins along with unpleasant flavors to the food.
Once the charcoal is good and hot, you can use the chimney to position them under the grates on one side or on the outsides of the grilling surface to give you options for where to place the food for less char than you'd get with direct heat. This will also help reduce health risks while you add flavor with that grilled smokiness to your food.
How To Grill : Getting Ready
Step 1: Get It Hot
Preheat it for 15-20 minutes before you start cooking. A properly-heated grill will help sear the outside of your meat and prevent it from sticking. Here’s the temperature breakdown for reference:
-
High, 400-450°F
-
Medium High, 350-400°F
-
Medium, 300-350°F
-
Low, 250-300°F
Step 2: Scrape The Hot Grill Grates
Every time you grill, make sure to scrape off any food residue from your previous meal after you have let it heat up. Built-up residue can cause food to taste burnt and be a breeding ground for bacteria and viruses.
Additionally, dirty grills are more prone to fires and flare ups when grilling, thus burning the food which creates chemicals known to cause cancer, something we obviously want to avoid.
Go one step further once or twice a year to do a deep cleaning.
Once the coals are ready, place the grill grate on top and clean thoroughly with a grill brush.
Another option is to take an onion stump drizzled with olive oil and rub the grill grates with it, which not only cleans but also seasons the grill.
Now that your grill is ready, it’s time to get cooking!

How To Grill: Getting The Most Nutrients From Your Grilled Food
When it comes to the grill, people tend to stick with their tried-and-true cooking techniques …. sometimes at the loss of nutrients and flavor along the way.
To get the most nutrients from every bite, here are six easy tips to make sure your veggies aren’t overcooked and your grilled meat is tasty and juicy:
Grill Tip 1: Parchment Before Aluminum
When making foil packets to toss on the grill, always use a sheet of parchment between your food and the aluminum.
This Dishing Up Nutrition episode described why: “Aluminum hampers the body's ability to utilize calcium, magnesium, phosphorus, and vitamin A. Here's another shocking piece of information: impaired memory, motor coordination, and also Alzheimer's disease and osteoporosis have been linked to systemic aluminum toxicity.”
Yikes! Heed these warnings by using parchment paper between the food and the aluminum foil.
Grill Tip 2: Indirect Heat For Veggies Is Best
For veggies, the higher & longer the heat, the more polyphenols will be lost. Polyphenols help protect your body from oxidative stress, which can cause inflammation, certain cancers and coronary heart disease.
Put your vegetables on the cooler side of the grill in the area of indirect heat before you lower the lid. This will keep them crisp tender and lock in more of those nutrients.
This is important even if you are using a gas grill or for when you cook meat.
Most of the harmful chemicals are produced when the food is placed directly above the heat source and the fat from the meat is allowed to drip on the coals. You can avoid this issue by positioning coals to the side of the grill and food in the center when cooking, like mentioned above.
Grill Tip 3: Use Separate Skewers
For a better result – more even and thorough cooking – keep your meat and veggies on separate skewers or kabobs.
This will ensure your protein can cook evenly without overcooking your veggies, which can diminish their quality.
Note: if you’re using wooden skewers, make sure to soak them for 30 minutes or so in water before use. This will prevent them from catching fire and ruining your meat or veggies.
Grill Tip 4: Employ The 80/20 Rule For Meat
This is one of those things that every griller has an opinion on and here is ours: we personally use the 80/20 method when cooking meat.
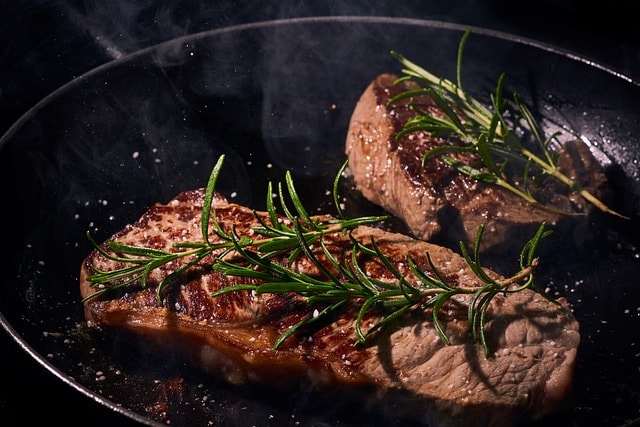
Cook steaks, burgers, or chicken breasts 80% on one side, then finish on the other side for the final 20% of the time. This gives a nice crust and allows for the juices to stay inside with less flipping. (Note that pork chops require a slightly different grill approach, google that and test the many opinions!)
Once it’s done, make sure to rest your meat.
If you cut into your pork chop, chicken, or burger when it’s still piping hot, all the juices will run out and your meat will be dry. Letting it rest for 10 minutes on a plate tented with foil (not touching the meat) allows the juices to cool just enough so they don’t all end up on your plate.
When in doubt about the doneness of your meat, use a meat thermometer to check the internal temperature. This can help get you a tender meat without overcooking it.
Grill Tip 5: Avoid Grill Marks
The charred compounds (heterocyclic amines) on meat and veggies taste good and gives us those telltale grill marks … however, they have been linked to some kinds of cancer. Not worth it.
Avoid this by keeping flare-ups down with a spray bottle of water and by cooking at lower temperatures.
Choosing leaner cuts of meat will also reduce the risk of grease fires.
Learn More: Charred Foods And Cancer: Ask A Nutritionist podcast
Grill Tip 6: Cast Iron Skillet To The Rescue
Don’t forget about your cast iron skillet! It is a great grilling tool to keep veggies from falling through the grates and provides a nice, even heat.
So many people think of their iron skillet as just a kitchen tool, but it’s so versatile and works just as well on the grill (or on the top of a campfire if you're camping!).
Friendly reminder to never use soap on your cast iron pans since it will remove that beautiful layer of seasoning you are trying to develop. Use a scrubby pad and a little water to remove stuck on food, then wipe it down with a very thin layer of oil.
In addition to your cast iron skillet, investing in a grill basket can make cooking up those veggies a little easier when doing outdoor cooking.
Recap on How To Grill
To summarize...
-
Choosing between a gas or charcoal grill is up to the griller. Whichever method is easier for you - electric grill, gas grill, or charcoal grill -
-
Heat up your outdoor grill first, then give the grill grate a good scrape.
-
Opt to cook food over indirect heat rather than direct heat to prevent charring your meal. Put parchment around food when using aluminum foil and soak your wooden skewers before using them.
-
Cook meat until 80% done on one side before flipping it to finish cooking and then let it rest to let the juices reabsorb before cutting into it.
-
Don't forget your cast iron can be a helpful cooking method and cooking extra meat or veggies can be repurposed later for an easy weeknight dinner.
Like these grilling tips and want more like it?

Take a virtual cooking demonstration class with our talented chef and virtual cooking class teacher, Marianne.
Cooking classes cover topics from batch cooking to Instant Pot tutorials, all designed to build your confidence in the kitchen (or grill!) and take control of your health.
For more information on grilling and recipes for grilling , check out these resources:
LISTEN: Charred Foods And Cancer: Ask A Nutritionist-As we enter the peak of grilling season, Brandy on Dishing Up Nutrition's Ask a Nutritionist tackles a burning question: Do burnt foods cause cancer? Learn about the chemical changes in overcooked foods and get practical advice to reduce risks while enjoying your BBQ favorites.
TRY: Grilled Peaches & Cream Recipe a perfect dessert (or bedtime snack) from the grill!
TRY: Grilled Steak with Chimichurri Sauce Recipe
TRY: Grilled Chicken Thighs & Zucchini Recipe
TRY: Spicy Shrimp


kelly
Grilled chicken is my weakness. In fact I like grilled shrimps, vegetables as well. Your recipes are tempting that I can't resist cooking. And the tips are handy! Thanks.
June 6, 2018 at 12:57 pm
admin
Glad to hear you are enjoying grilling season and we can be here for some recipe inspiration.